Key Management System (KMS)
Introduced in Apache CloudStack 4.23, the Key Management System (KMS) lets you encrypt storage volumes using keys stored in a hardware security module (HSM). Previously, volume passphrases were encrypted with a single key stored in the database. If no KMS key is provided, CloudStack falls back to this legacy behavior.
Architecture and Design
KMS is built around a two-tier key hierarchy to protect data at rest:
KEK (Key Encryption Key) — The master key that never leaves the secure backend. KEKs are stored in and managed by the configured KMS provider.
DEK (Data Encryption Key) — The key that encrypts the actual data (e.g., Volumes). DEKs are stored wrapped by the KEK and are only decrypted in memory when needed.
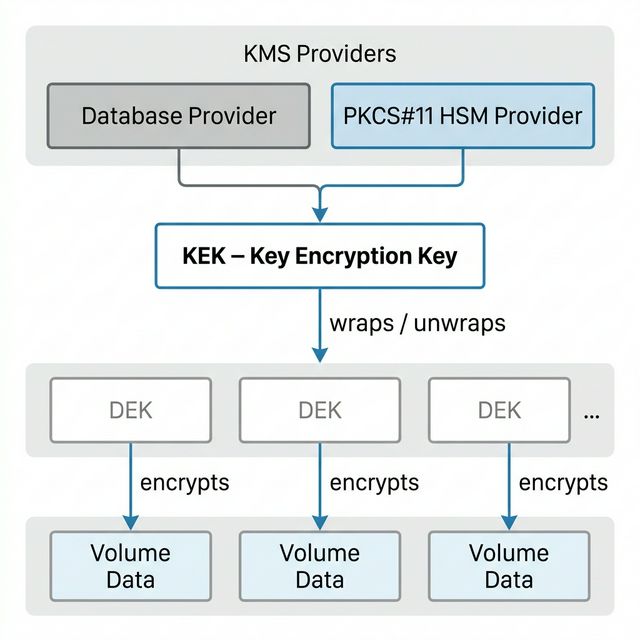
Pluggable Provider Framework
The KMS architecture is designed to be extensible. CloudStack currently ships two providers:
Database Provider — A built-in fallback provider that stores wrapped keys in the CloudStack database. Suitable for environments without dedicated HSM hardware.
PKCS#11 HSM Provider — Integrates with dedicated Hardware Security Module devices via the PKCS#11 standard allowing integration with various HSM providers.
HSM Profiles
Each KMS Key is stored in a Hardware Security Module. The root admin registers HSM Profiles that capture the connection configuration for a specific HSM device (e.g., PKCS#11 library path, slot, PIN). Sensitive fields such as PINs and passwords are automatically encrypted at rest and masked in responses.
Note
HSM Profiles can be created only by root administrators and can be scoped to a zone, account, or can be made global (available to all zones).
Managing HSM Profiles
Before creating a KMS key, an administrator must register an HSM Profile.
Adding an HSM Profile
Log in to the CloudStack UI as a root administrator.
In the left navigation bar, click HSM Profile under Key Management.
Click on Add HSM Profile +.
Provide the following details:
Name — A unique name for the profile.
Zone — The zone this profile is scoped to. Leave blank to make it available to all zones.
Vendor Name — The HSM device vendor.
System — Check this to make the profile globally available. Uncheck to scope it to an account or zone.
Details — Protocol-specific key-value pairs such as
library,slot, andpinfor PKCS#11.
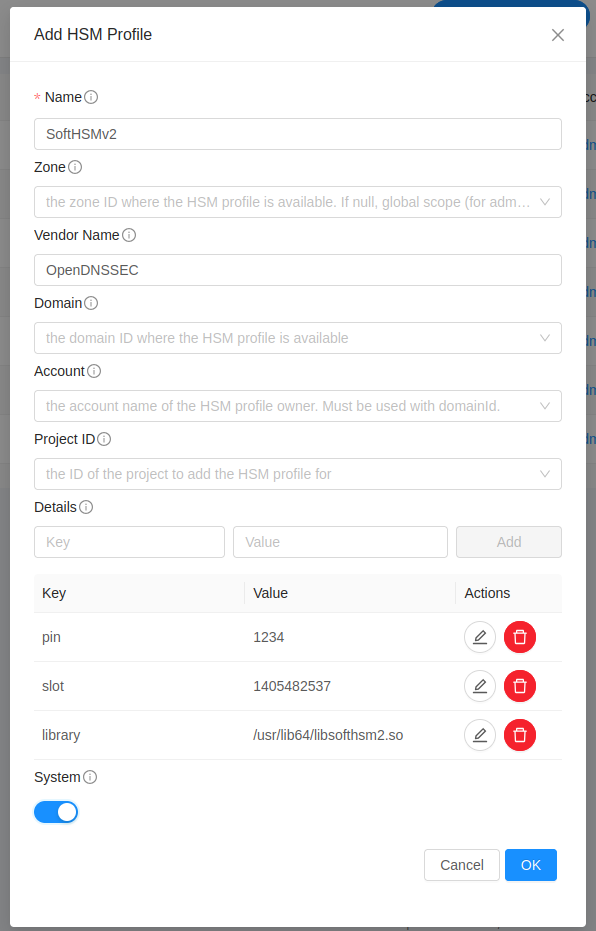
Click OK.
Note
If access to the HSM is lost, CloudStack will be unable to access volumes encrypted with the keys managed by this HSM profile and the volumes will be inaccessible.
Note
Sensitive fields (PINs, passwords) are automatically masked in the UI and API responses after the profile is created.
Note
The operator has to ensure that the required HSM libraries are installed on all the management servers and depending on the HSM provider, there might be some additional configuration required on each of the management servers.
Managing KMS Keys
KMS Keys (Key Encryption Keys / KEKs) are zone-scoped: a key created in one zone cannot be used in another. Keys can be created by users and administrators.
Creating a KMS Key
Log in to the CloudStack UI.
In the left navigation bar, click KMS Keys under Key Management.
Click Create KMS Key +.
Provide the following details:
Name — A name for the key.
Description — An optional description.
Zone — The zone in which the key will be valid.
HSM Profile — The HSM profile to use as the backend for this key.
Key Size — Bits for the KEK:
128,192, or256(default).
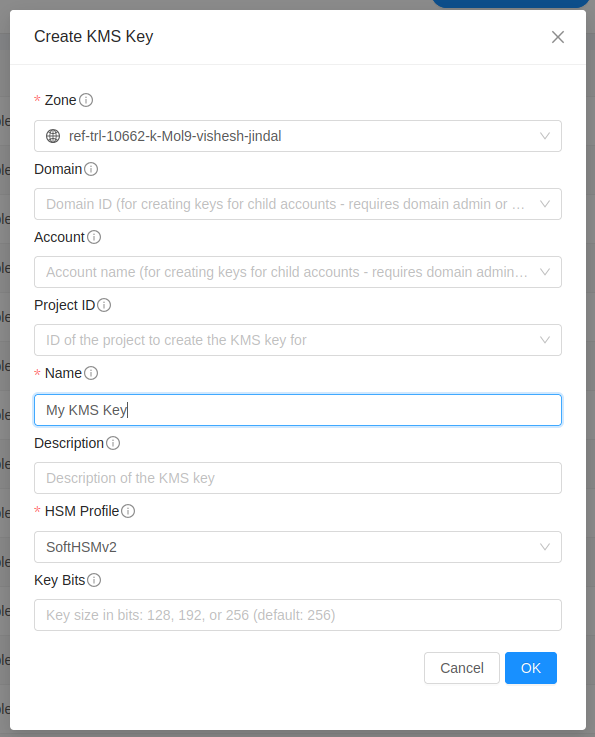
Click OK. The key is created in the specified HSM and becomes available for encrypting volumes in the selected zone.
Rotating a KMS Key
Key rotation generates a new version of the KEK and automatically schedules background re-encryption of all DEKs protected by the old version. This is an asynchronous operation.
In the left navigation bar, click KMS Keys under Key Management.
Open the Details page for the key you want to rotate.
Click the Rotate KMS Key button.
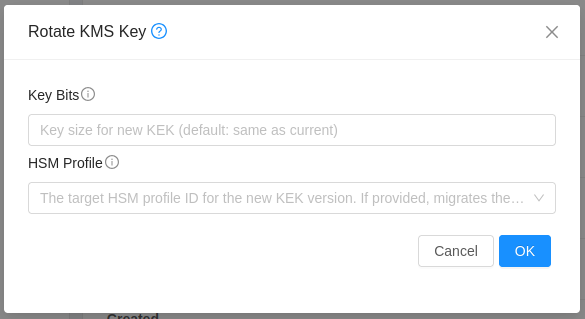
Confirm the rotation. A background job is created that progressively rewraps all DEKs to the new KEK version without ever exposing the plaintext DEKs.
Note
The rewrapping job runs in batches. The kms.rewrap.batch.size and
kms.rewrap.interval.ms settings control how quickly DEKs are re-encrypted
after rotation (see KMS Configuration Settings).
Migrating Existing Volumes to KMS
Existing volumes that use older passphrase-based encryption can be migrated to KMS-managed
envelope encryption without data loss. This is an administrator-only operation and is
performed using the migrateVolumesToKMS API. The migration runs as an asynchronous
background job.
Note
Migrated volumes will be re-encrypted under the KMS envelope encryption model, removing the dependency on a static passphrase. Scope the migration by zone, account, or domain, or provide specific volume IDs for selective migration.
For full API parameter details, see the CloudStack API Reference.
KMS Configuration Settings
The following global configuration settings are available to tune KMS behaviour. They can be found under Global Settings in the CloudStack UI.
Configuration |
Default |
Description |
|---|---|---|
|
|
Size of generated DEKs in bits. Valid values
are |
|
|
Number of retry attempts on transient KMS operation failures. |
|
|
Base delay in milliseconds for exponential back-off between retry attempts. |
|
|
Timeout in seconds for a single KMS cryptographic operation. |
|
|
Number of DEKs to rewrap per background job iteration during KEK rotation. |
|
|
Interval in milliseconds between background DEK rewrapping runs (default: 5 minutes). |